Using MVVM Light in WPF for Model-View-ViewModel implementation
Posted by: Mahesh Sabnis , on 9/1/2014, in Category WPF
Views: 92678
Abstract: The MVVM Light toolkit provides a lot of boiler plate code to implement Model-View-ViewModel based applications quickly and gives the user the freedom to customize and design the application. This article shows how to get started with MVVM development for WPF applications.
Separation of Concerns (decoupling) or SoC is a principle that promotes best practices for software architecture. A ‘concern’ can be considered as an aspect of software functionality. For eg: The UI can be a concern, the business logic can be another concern and so on. The idea is to make sure each concern has a single, well-defined purpose and to find a balanced way to separate these features and concepts into different modules. This ultimately reduces duplicate code and keeps the modules decoupled from each other, making our application maintainable and manageable. As a very basic example of SoC, think about HTML, CSS and JavaScript, where all these technologies have a well-defined purpose. HTML defines the content structure, CSS defines content presentation and JavaScript defines how the content interacts and behaves with the user.
The main purpose of the MVVM Light toolkit is to accelerate the creation and development of MVVM applications in WPF, Silverlight, Windows Store (RT) and for Windows Phone
The steps explained in this article are targeted specifically towards those who want to start with MVVM development and require a readymade toolkit for developing their WPF applications.
Project templates for Visual Studio 2012 and 2013 can be downloaded at http://mvvmlight.codeplex.com/releases/view/115541 . Currently the templates are only provided for Visual Studio 2012 and 2013 for the Pro, Premium and Ultimate editions. The MvvmLight.VS2012.vsix is for Visual Studio 2012 and MvvmLight.VS2013.vsix is for Visual Studio 2013. Depending on your versions of Visual Studio, once the respective template is installed, the project template will be available as shown in Figure 1:
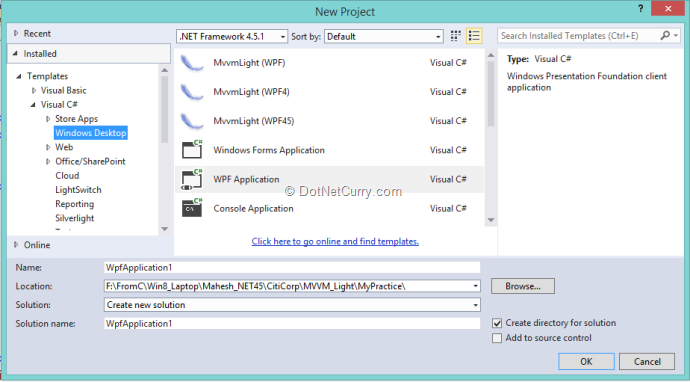
Figure 1: MVVM Light Toolkit template in VS 2013
These project template by default provides the necessary libraries for the MVVM Light Framework with the project structure containing ViewModel classes, Models as shown in Figure 2:
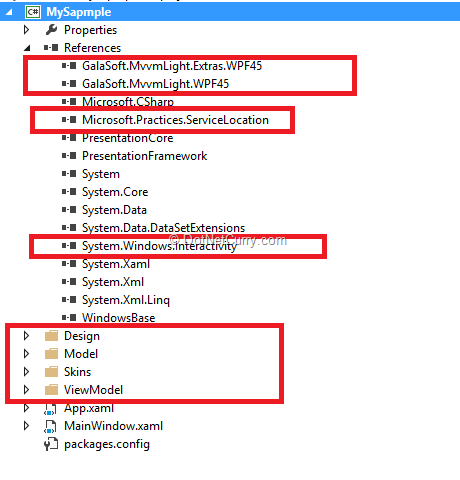
Figure 2: MVVM Light libraries in Visual Studio
The libraries provide classes for implementing ViewModels with notifiable properties, Command, etc.
If we need to add MVVM Light libraries in an already existing project, then we can make use of the NuGet package to get these libraries. To do so, open an existing WPF project in Visual Studio > right-click on the project > select Manage NuGet Package > and select MVVM Light libraries from the NuGet Window as shown in Figure 3:
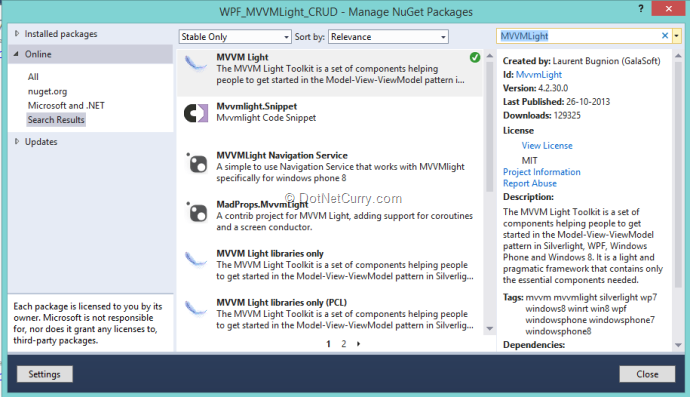
Figure 3: MVVM Light NuGet Package
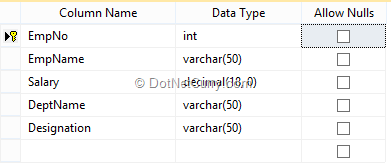
Figure 4: SQL Server Employee table
Step 1: Open Visual Studio and create a WPF Application and name it ‘WPF_MVVMLight_CRUD’. To this project, add the MVVM Light Libraries using NuGet Package as discussed in Installation section. The project will add necessary libraries and the ‘ViewModel’ folder with the following two classes:
- MainViewModel.cs - This class is inherited from ViewModelBase class and it provides access to RaisedPropertyChanged method for notifiable properties.
- ViewModelLocator.cs - This class is used to contain static references for all the view models in the application. The constructor of this class provides a very simple IOC container for registering and resolving instances. The code is as shown here:
Information about the Service Locator can be found over here: http://msdn.microsoft.com/en-us/library/ff648968.aspx
The class registers the MainViewModel class in the IOC container in its constructor :
This article is published from the DotNetCurry .NET Magazine – A Free High Quality Digital Magazine for .NET professionals published once every two months. Subscribe to this eMagazine for Free and get access to hundreds of free .NET tutorials from experts
To realize the SoC principle, many Design Patterns have emerged over the years. For example, Model-View-Presenter (MVP) is suited for Windows Forms; Model-View-Controller (MVC) for ASP.NET MVC; Model-View-ViewModel (MVVM) works well with WPF and so on. For those interested, there’s a good article by Martin Fowler which explains the differences in these patterns over here.What is Model-View-ViewModel (MVVM)?
XAML enables SoC in WPF, Silverlight, Windows Phone, and Windows 8 apps by separating the GUI of the application from the programming logic (coded in C #or VB.NET). Model-View-ViewModel (MVVM) is a design pattern that addresses SoC by allowing separation of your Business logic from the View (UI), which ultimately makes it easier to write unit tests and enables parallel development and design. It leverages the rich data binding capabilities of the XAML platform to expose the view model to the UI through the view's DataContext property. The business layer is also termed as Model whereas the ViewModel layer is responsible for exposing data objects from model to the UI using DataBinding. The ViewModel contains the View display logic where actions on UI can be handled using Commands properties declared in ViewModel.Why MVVM Light?
In order to implement MVVM, you need to first understand commanding, messaging and binding. Then you need to understand the MVVM principles and implement these principles keeping a nice balance of power and simplicity in your development. You also need to provide Unit Testing support. All in all, this this takes a considerable amount of time and efforts. Luckily there are some nice MVVM frameworks to choose from like Prism, Cailburn, nRoute and Galasoft’s MVVM Light Toolkit. We will be exploring how to implement MVVM in WPF applications using the MVVM Light Toolkit by Laurent Bugnion.The main purpose of the MVVM Light toolkit is to accelerate the creation and development of MVVM applications in WPF, Silverlight, Windows Store (RT) and for Windows Phone
The steps explained in this article are targeted specifically towards those who want to start with MVVM development and require a readymade toolkit for developing their WPF applications.
Installing MVVM Light
The MVVM Light toolkit can be downloaded from https://mvvmlight.codeplex.com/.Project templates for Visual Studio 2012 and 2013 can be downloaded at http://mvvmlight.codeplex.com/releases/view/115541 . Currently the templates are only provided for Visual Studio 2012 and 2013 for the Pro, Premium and Ultimate editions. The MvvmLight.VS2012.vsix is for Visual Studio 2012 and MvvmLight.VS2013.vsix is for Visual Studio 2013. Depending on your versions of Visual Studio, once the respective template is installed, the project template will be available as shown in Figure 1:

Figure 1: MVVM Light Toolkit template in VS 2013
These project template by default provides the necessary libraries for the MVVM Light Framework with the project structure containing ViewModel classes, Models as shown in Figure 2:

Figure 2: MVVM Light libraries in Visual Studio
The libraries provide classes for implementing ViewModels with notifiable properties, Command, etc.
If we need to add MVVM Light libraries in an already existing project, then we can make use of the NuGet package to get these libraries. To do so, open an existing WPF project in Visual Studio > right-click on the project > select Manage NuGet Package > and select MVVM Light libraries from the NuGet Window as shown in Figure 3:

Figure 3: MVVM Light NuGet Package
Using MVVM Light in WPF 4.5
In the following steps, we will make use of MVVM Light for implementing a WPF application that performs some basic database operations. In these steps, we will make use of the following features of MVVM Light:- Creating ViewModel using ViewModelBase class.
- Defining Notifiable properties in ViewModel class and raising PropertyChanged event on them using RaisedPropertyChanged method from the ViewModelBase class.
- Using RelayCommand class provided by Commanding for method execution based upon actions taken on UI.
- Using EventToCommand class provided by Commanding to defining commands on the WPF elements that do not by default support the Command property.
- Messenger feature for exchanging messages across objects.

Figure 4: SQL Server Employee table
Step 1: Open Visual Studio and create a WPF Application and name it ‘WPF_MVVMLight_CRUD’. To this project, add the MVVM Light Libraries using NuGet Package as discussed in Installation section. The project will add necessary libraries and the ‘ViewModel’ folder with the following two classes:
- MainViewModel.cs - This class is inherited from ViewModelBase class and it provides access to RaisedPropertyChanged method for notifiable properties.
- ViewModelLocator.cs - This class is used to contain static references for all the view models in the application. The constructor of this class provides a very simple IOC container for registering and resolving instances. The code is as shown here:
ServiceLocator.SetLocatorProvider(() => SimpleIoc.Default); |
The class registers the MainViewModel class in the IOC container in its constructor :
SimpleIoc.Default.Register |
SimpleIoc.Default.Register |
public MainViewModel Main{ get { return ServiceLocator.Current.GetInstance }} |
<vm:viewmodellocator d:isdatasource='"True"' x:key='"Locator"'></vm:viewmodellocator> |
Step 2: In the project, add a new folder with the name ‘Model’. In this folder, add a new ADO.NET Entity Data Model with the name ‘CompanyEDMX’ > select the SQL Server Database and the EmployeeInfo table. After the completion of the wizard, the following table mapping will be displayed:
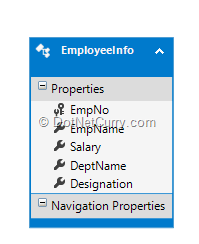
Figure 5: Employee Table Mapping
Step 3: Now add a new folder called ‘Services’ and in this folder, add a class file with the following code:
using System.Collections.ObjectModel;using WPF_MVVMLight_CRUD.Model;namespace WPF_MVVMLight_CRUD.Services{ /// /// The Interface defining methods for Create Employee and Read All Employees /// |
public interface IDataAccessService { ObservableCollection GetEmployees(); int CreateEmployee(EmployeeInfo Emp); } /// /// Class implementing IDataAccessService interface and implementing /// its methods by making call to the Entities using CompanyEntities object /// public class DataAccessService : IDataAccessService { CompanyEntities context; public DataAccessService() { context = new CompanyEntities(); } public ObservableCollection GetEmployees() { ObservableCollection Employees = new ObservableCollection() ; foreach (var item in context.EmployeeInfoes) { Employees.Add(item); } return Employees; } public int CreateEmployee(EmployeeInfo Emp) { context.EmployeeInfoes.Add(Emp); context.SaveChanges(); return Emp.EmpNo; } }}Step 4: To register the Data Access service in the IoC, we need to register the DataAccessService class in it. To do so, open the ViewModelLocator class, and add the following line:
SimpleIoc.Default.Register |
Step 5: Let’s implement the logic for reading all Employees from the table.
In the MainViewModel class, add the following Public notifiable property:
ObservableCollectionpublic ObservableCollection{ get { return _Employees; } set { _Employees = value; RaisePropertyChanged("Employees"); }} |
Define the IDataAccessService object at the ViewModel class level as shown here:
IDataAccessService _serviceProxy; |
/// /// Method to Read All Employees/// |
void GetEmployees(){ Employees.Clear(); foreach (var item in _serviceProxy.GetEmployees()) { Employees.Add(item); }}In the ViewModel class, now define RelayCommand object as below:
public RelayCommand ReadAllCommand { get; set; } |
public MainViewModel(IDataAccessService servPxy){ _serviceProxy = servPxy; Employees = new ObservableCollection ReadAllCommand = new RelayCommand(GetEmployees);} |
Step 6: In the project, add a new MVVM View provided by the MVVM Light toolkit as seen here:
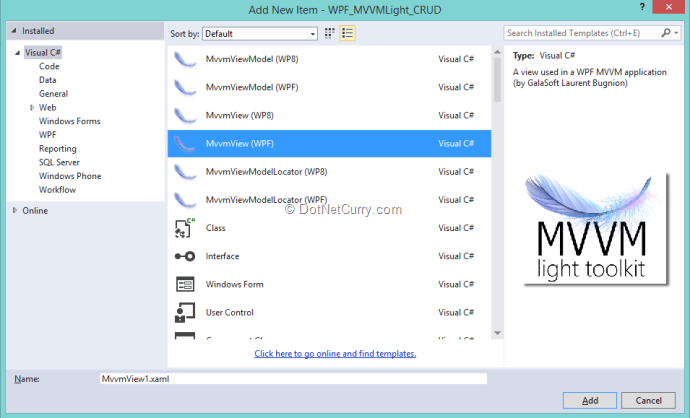
Figure 6: MvvmView template
Name this view ‘EmployeeInfoView.xaml’.
Note: By default, the MVVM Light View adds the WPF Window, so for this application we will be replacing the Window by a UserControl. Once you change the root tag of the View from Window to UserControl, in the code behind of the view, change the base class from Window to UserControl.
Step 7: In this view, add a DataGrid, TextBlock and a Button as shown in Figure :
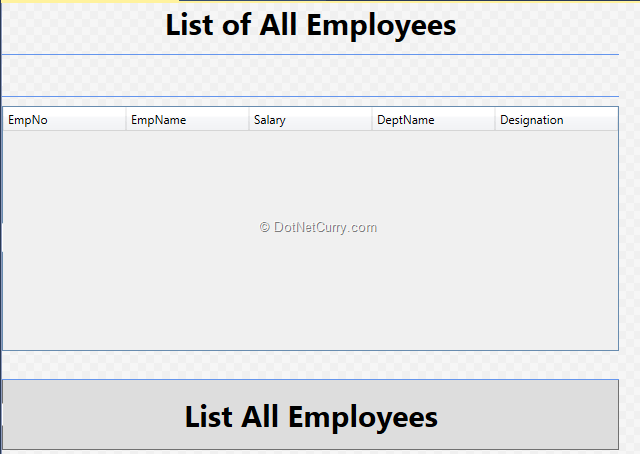
Figure 7: UI Design of our application
In the XAML part, set the DataContext property of the UserControl to the ‘Main’ property exposed by the ViewModelLocator class:
DataContext="{Binding Main, Source={StaticResource Locator}}" |
Bind the ReadAllCommand command and the Employees collection properties of MainViewModel to the Button and DataGrid respectively :
<button x:name='"btnloadallemployees"' readallcommand}"="" command='"{Binding' fontweight='"Bold"' fontsize='"30"' grid.row='"3"' employees"="" all="" content='"List'><datagrid grid.row='"2"' isreadonly='"True"' rendertransformorigin='"0.5,0.5"' margin='"0,10,0,28"' columnwidth='"*"' employees}"="" itemssource='"{Binding' x:name='"dgemp"'></datagrid></button> |
To add the View in the MainWindow.xaml, the namespace of the View must be registered in the Window tag:
xmlns:Views="clr-namespace:WPF_MVVMLight_CRUD.Views" |
<views:employeeinfoview grid.column='"0"/'> </views:employeeinfoview> |
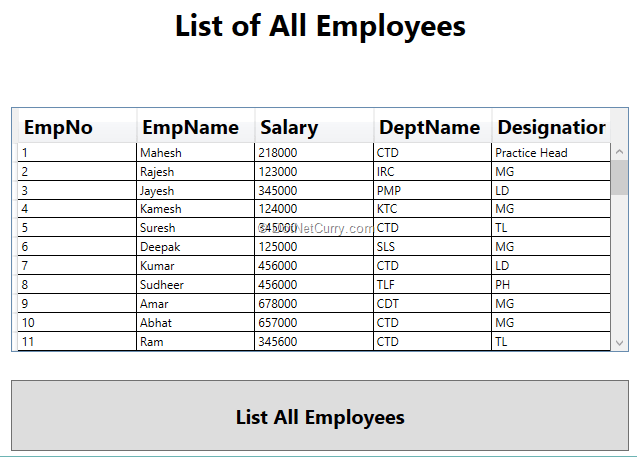
Figure 8: List all employees
Passing Parameters from View to the ViewModel
In the previous steps, we discussed how to create ViewModel, defining notifiable properties and the RelayCommand. In this section, we will discuss how to send data from View to the View Model and write in into our database table.Step 1: In the MainViewModel, declare the following property:
EmployeeInfo _EmpInfo;public EmployeeInfo EmpInfo{ get { return _EmpInfo; } set { _EmpInfo = value; RaisePropertyChanged("EmpInfo"); }} |
Define the following method which accepts the EmployeeInfo object and saves it to the table by calling the CreateEmployee() method from the DataAccessService class.
void SaveEmployee(EmployeeInfo emp){ EmpInfo.EmpNo = _serviceProxy.CreateEmployee(emp); if(EmpInfo.EmpNo!=0) { Employees.Add(EmpInfo); RaisePropertyChanged("EmpInfo"); }} |
Now define the RelayCommand object property in the ViewModel class:
public RelayCommandget; set; } |
Instantiate EmpInfo and RelayCommand in the ViewModel constructor:
EmpInfo = new EmployeeInfo();SaveCommand = new RelayCommand |
Step 2: Open App.Xaml and in resources, add styles for TextBlock and TextBoxes :
<style textblock}"="" targettype='"{x:Type'> <Setter Property="FontSize" Value="20"></Setter> <Setter Property="FontWeight" Value="Bold"></Setter></style><style targettype='"{x:Type' textbox}"=""> <Setter Property="FontSize" Value="20"></Setter> <Setter Property="FontWeight" Value="Bold"></Setter></style> |
Step 3: In the Views folder of the project, add a new UserControl (you can use MVVM Light View also), and name it as ‘SaveEmployeeView.xaml’. In the View, add TextBlocks, TextBoxes and a Button. Set the DataContext of the UserControl to the Main property of the MainViewModel.
DataContext="{Binding Main, Source={StaticResource Locator}}" |
<textbox grid.column='"1"' empinfo.empno,mode='TwoWay}"/' text='"{Binding' textwrapping='"Wrap"'><textbox grid.row='"1"' grid.column='"1"' text='"{Binding' textwrapping='"Wrap"' empinfo.empname,mode='TwoWay}"/'><textbox grid.row='"2"' grid.column='"1"' text='"{Binding' textwrapping='"Wrap"' empinfo.salary,mode='TwoWay}"/'><textbox grid.row='"3"' grid.column='"1"' text='"{Binding' textwrapping='"Wrap"' empinfo.deptname,mode='TwoWay}"/'><textbox grid.row='"4"' grid.column='"1"' text='"{Binding' textwrapping='"Wrap"' empinfo.designation,mode='TwoWay}"/'><button command='"{Binding' fontweight='"Bold"' fontsize='"20"' grid.row='"5"' content='"Save' empinfo}"="" commandparameter='"{Binding' savecommand}"="" grid.columnspan='"2"' employee"=""></button></textbox></textbox></textbox></textbox></textbox> |
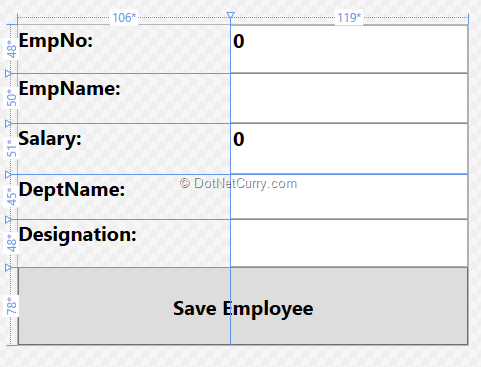
Step 4: Add the UserControl we just created in MainWindow.xaml in the second column (column index 1):
<views:saveemployeeview grid.column='"1"/'></views:saveemployeeview> |
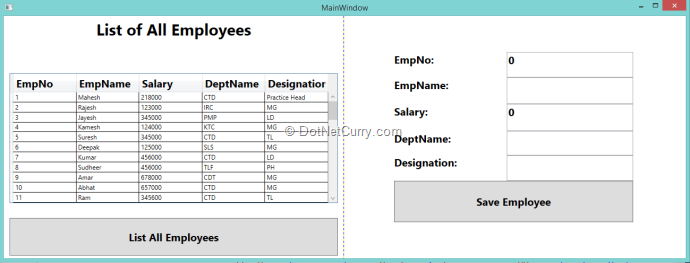
Figure 10: List All Employees View
I have not added any validations to keep the scope of this article concise, but you should. Enter Employee Data (except EmpNo) and click on the ‘Save Employee’ button. The record gets added. Now scroll to the bottom of the DataGrid and you will find our newly added the record:
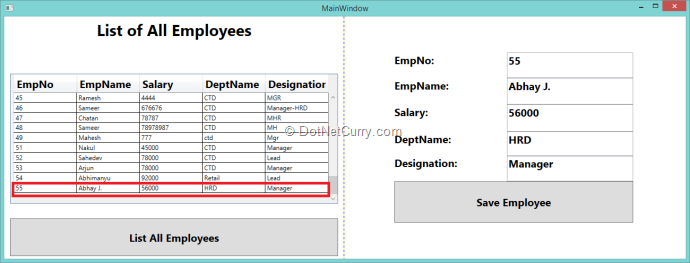
Figure 11: Newly added record
We have seen how to make use of the generic command to pass parameters from UI to ViewModel.
Defining Commanding on UI Elements not having the Command property
UI elements like Button, RadioButton, etc. expose the command property using which methods from the ViewModel can be executed. But what if we need to have a search textbox on the UI in which when the data is entered, matching data from the textbox is searched from a collection and displayed on the UI. In this case, we need to change the behaviour of the textbox to support commanding.
When we add the MVVM Light libraries in the project, the project also adds the System.Windows.Interactivity.dll assembly. This assembly allows us to define behaviours for the UI elements.
The MVVM Light library provides an EventToCommand class under the GalaSoft.MvvmLight.Command namespace. This class allows us to bind any event of any FrameworkElement to ICommand. In our case, we will use the EventToCommand to execute a method on the ViewModel class by defining command on the TextChanged event of the TextBox.
Step 1: Open the MainViewModel and add the following property, method and command in it:
public string EmpName{ get { return _EmpName; } set { _EmpName = value; RaisePropertyChanged("EmpName"); }} |
void SearchEmployee(){ Employees.Clear(); var Res = from e in _serviceProxy.GetEmployees() where e.EmpName.StartsWith(EmpName) select e; foreach (var item in Res) { Employees.Add(item); }} |
public RelayCommand SearchCommand { get; set; } |
SearchCommand = new RelayCommand(SearchEmployee); |
xmlns:i=http://schemas.microsoft.com/expression/2010/interactivityxmlns:mvvm="http://www.galasoft.ch/mvvmlight" |
<textblock grid.row='"1"' margin='"10,7,0,0"' text='"EmpName' textwrapping='"Wrap"' width='"231"/' verticalalignment='"Top"' search:"="" to="" horizontalalignment='"Left"'><textbox grid.row='"1"' margin='"262,7,0,0"' text='"{Binding' textwrapping='"Wrap"' width='"310"' verticalalignment='"Top"' horizontalalignment='"Left"' updatesourcetrigger='PropertyChanged}"' empname,="" height='"30"'> <i:interaction.triggers> <i:eventtrigger eventname='"TextChanged"'> <mvvm:eventtocommand command='"{Binding' mode='OneWay}"' searchcommand,=""> </mvvm:eventtocommand></i:eventtrigger> </i:interaction.triggers></textbox></textblock> |
Step 3: Run the application, click on the ‘List All Employees’ button and all employees will be displayed in the DataGrid:
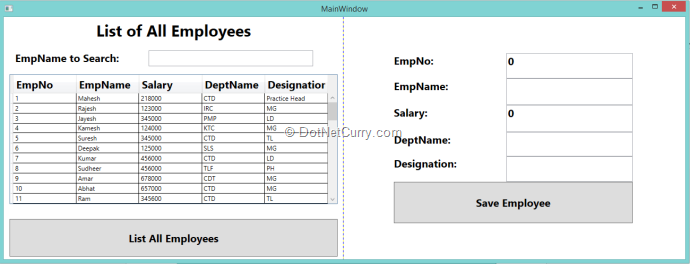
Figure 12: List All Employees
Enter some text in the EmpName to search the TextBox. The DataGrid will be populated by all Employee records having EmpName starting with the text entered in the textbox:
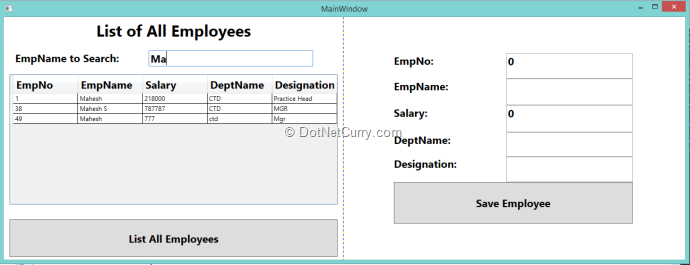
Figure 13: Search DataGrid
So using EventToCommand, we can easily bind the command to the FrameworkElement.
Managing Messaging across two Views
Typically when there are multiple Teams involved in the development stage, then there is a possibility that they design separate views and these views are present on the same container. For e.g. take the EmployeeInfoView which shows list of all employees and SaveEmployeeView which performs Create, Update like operations. Now the requirement is that when an Employee is selected from the EmployeeInfoView, it should be displayed in the SaveEmployeeView for Updation purpose. There is a possibility that since both these views are having their own ViewModels, data will be send across these ViewModels.Since both views are separate, how do we send the selected employee from one view to other? Traditionally this can be made possible using Event handling mechanism. When an Employee is selected, raise the event and pass the employee information to this event and then listen to this event in some other view. This approach requires that both views should directly communicate with each other by having access to each other’s objects. This is a scenario of tight-coupling. So now the question is how to implement the same in a loosely-coupled manner?
The answer is to use the MVVM Light Messenger. This messenger provides a loosely-bound way to send message (data) from one ViewModel to other.
Diagrammatically the Messenger can be explained as below:
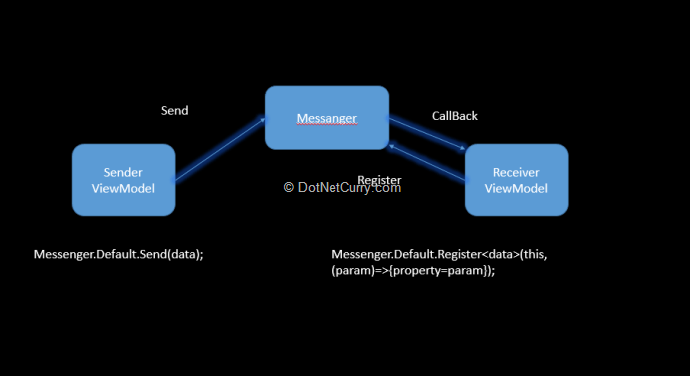
Figure 14: MVVM Light Messenger
Messenger is a singleton object which lives throughout the application. The sender ViewModel simply calls the static ‘Send’ method. The receiver ViewModel needs to register with the messenger to receive the object. It provides a call back function which gets called when the new message received. Let’s see how this is done.
Step 1: In the project add a new folder and name it ‘MessageInfrastructure’. In this folder, add a new class file:
using WPF_MVVMLight_CRUD.Model;namespace WPF_MVVMLight_CRUD.MessageInfrastructure{ public class MessageCommunicator { public EmployeeInfo Emp { get; set; } }} |
Step 2: In the MainViewModel add the following method:
void SendEmployeeInfo(EmployeeInfo emp){ if(emp!=null) { Messenger.Default.Sendnew MessageCommunicator() { Emp = emp }); }} |
The above method accepts an EmployeeInfo object and calls the Send() method of the Messenger, which is typed to the MessageCommunicator class. This means that the View which calls the above method, must pass the EmployeeInfo object.
In the ViewModel define the following RelayCommand object:
public RelayCommandget; set; } |
In the constructor of the ViewModel, define an instance of the RelayCommand as shown here:
SendEmployeeCommand = new RelayCommand |
|
<datagrid grid.row='"2"' isreadonly='"True"' rendertransformorigin='"0.5,0.5"' margin='"0,10,0,28"' columnwidth='"*"' employees}"="" itemssource='"{Binding' x:name='"dgemp"'> <i:interaction.triggers> <i:eventtrigger eventname='"SelectionChanged"'> <mvvm:eventtocommand command='"{Binding' commandparameter='"{Binding' mode='OneWay}"' elementname='dgemp,Path=SelectedItem}"' sendemployeecommand,=""> </mvvm:eventtocommand></i:eventtrigger> </i:interaction.triggers></datagrid> |
Step 3: Now we need to register for the messenger. To do so, in the MainViewModel add the following method:
void ReceiveEmployeeInfo(){ if (EmpInfo != null) { Messenger.Default.Registerthis,(emp)=>{ this.EmpInfo = emp.Emp; }); }} |
Step 4: Run the application, click on the Load All Employees button and the DataGrid will show all Employees. Select the Row from the DataGrid, the selected Employee Information will be displayed in the SaveEmployeeView as below:
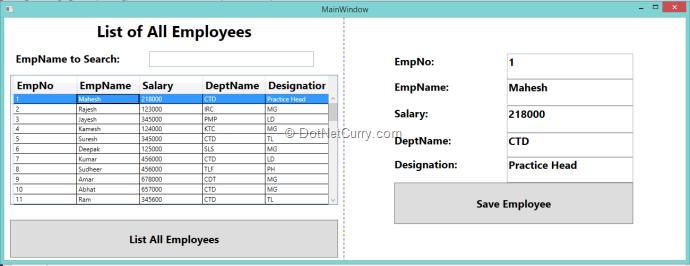
This shows how easily we can establish Messenger base communication across two separate views.
Conclusion
MVVM has lot of advantages, but it can involve a lot of efforts to set things up on your own. The MVVM Light toolkit provides a lot of boiler plate code to implement MVVM based applications quickly and gives the user the freedom to customize and design the application. With the ViewModelBase from the MVVM Light toolkit, we no longer have to implement INotifyPropertyChanged. Additionally the MVVM light toolkit provides Visual Studio templates, a messenger, an IoC container and some useful code snippets that can make our WPF applications shine!Download the entire source code from our GitHub Repository at bit.ly/dncm13-wpfmvvmlight

